How to Complete KYC Verification on FameEX? (Web)
2026-11-04 07:22:56FameEX provides a tiered Know Your Customer (KYC) verification process to help users verify their identity and access the corresponding account benefits. Depending on the verification level, users may need to submit valid identity documents, complete a facial liveness check, or provide proof of address. This guide covers the verification requirements and step-by-step instructions for completing KYC on FameEX.
1. What Are the KYC Verification Levels on FameEX?
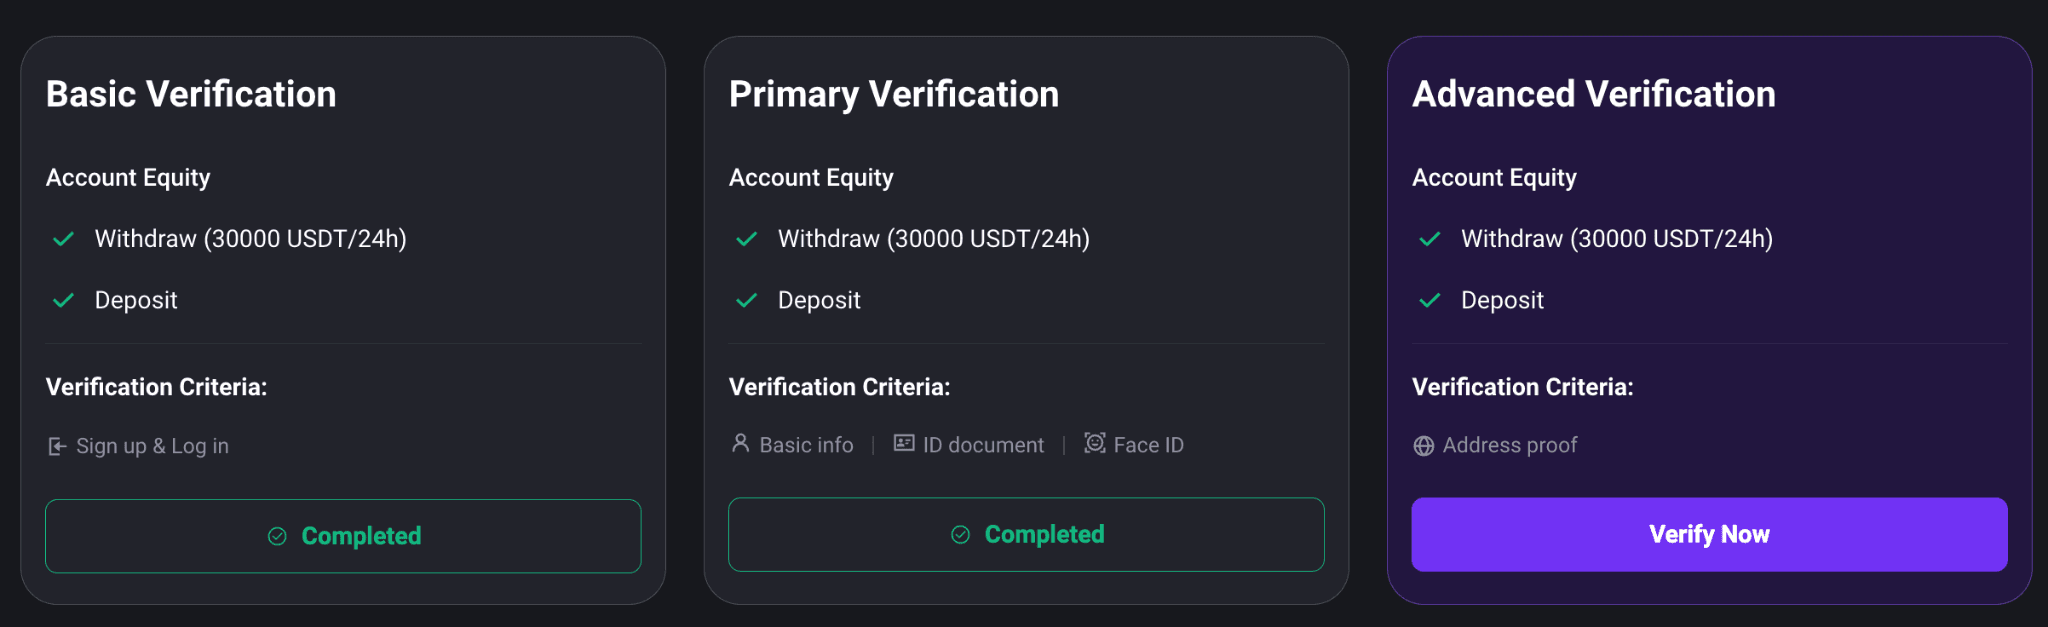
FameEX offers three verification levels: Basic Verification, Primary Verification, and Advanced Verification. Each level has specific requirements that users must meet to complete the verification process.
1) Basic Verification
Basic Verification is automatically completed once you successfully register and log in to your FameEX account. No additional identity documents are required.
2) Primary Verification
Users must provide basic personal information and a valid identity document. They must also complete facial verification to confirm their identity.
3) Advanced Verification
Users must first pass Primary Verification before applying for Advanced Verification. They must then submit valid proof of address documents to complete the additional identity verification process.
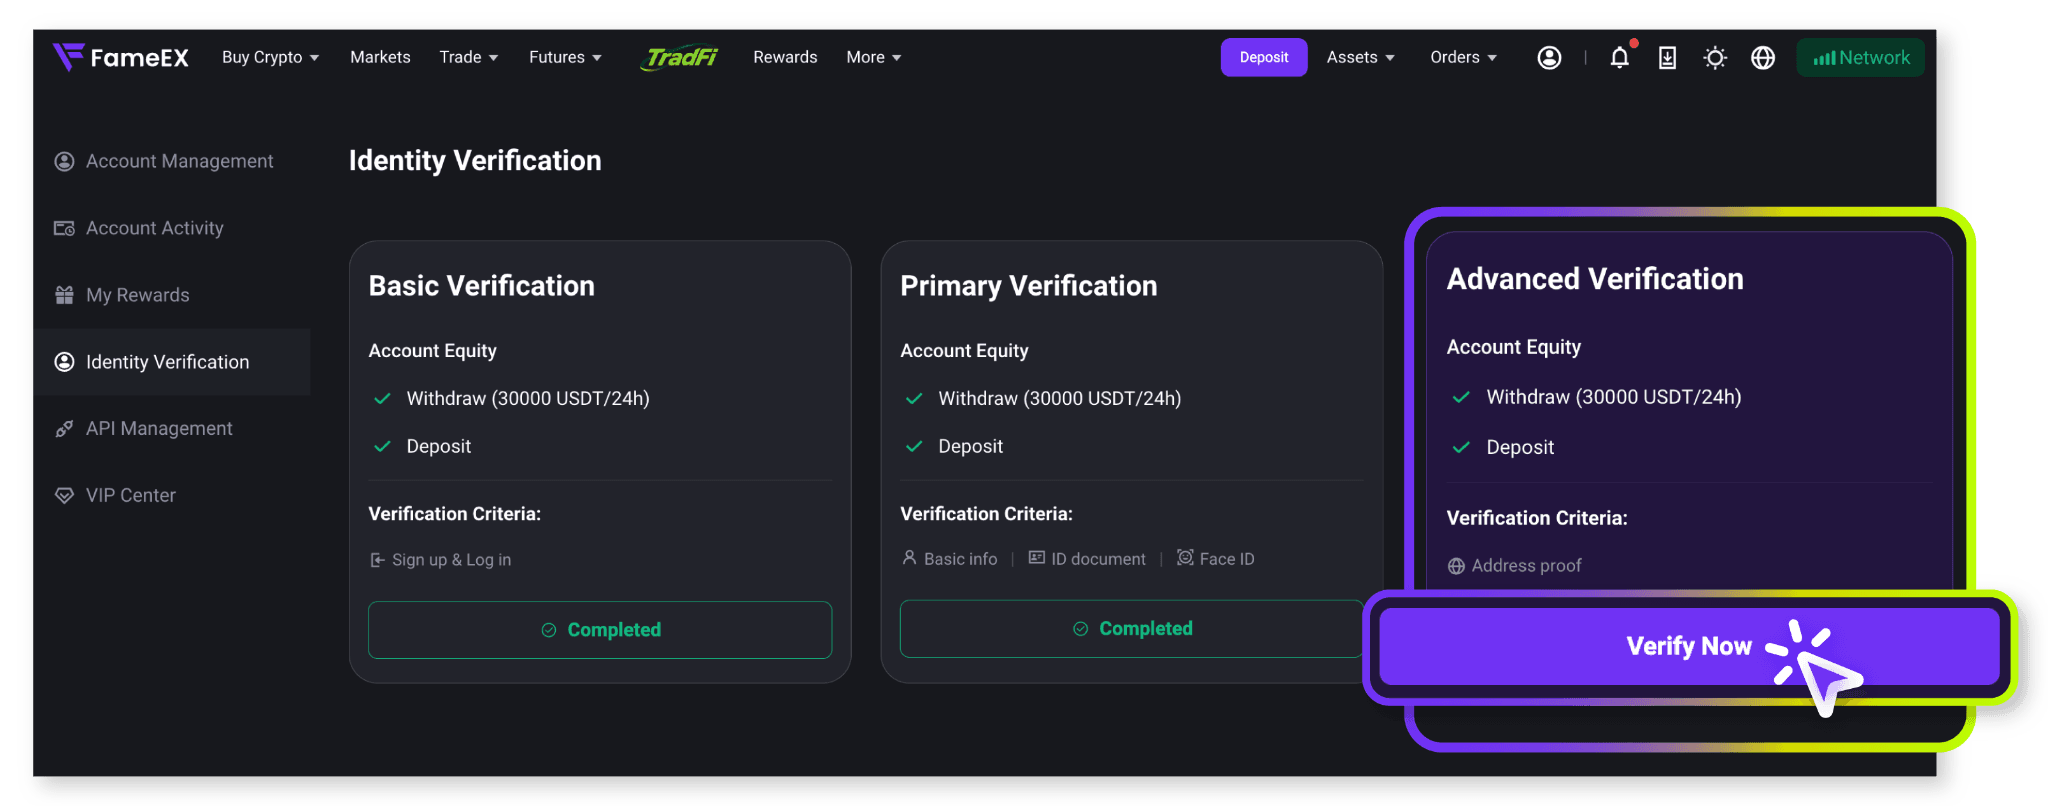
You can view the account benefits and withdrawal limits for each verification level under [Personal Center] - [Identity Verification]. Actual limits are subject to the information displayed on the platform.
2. How to Complete Primary Verification on FameEX?
FameEX uses Sumsub, a third-party identity verification service, to process Primary Verification. The process includes identity document uploads, facial liveness checks, and a verification review. Follow the steps below to complete your verification:
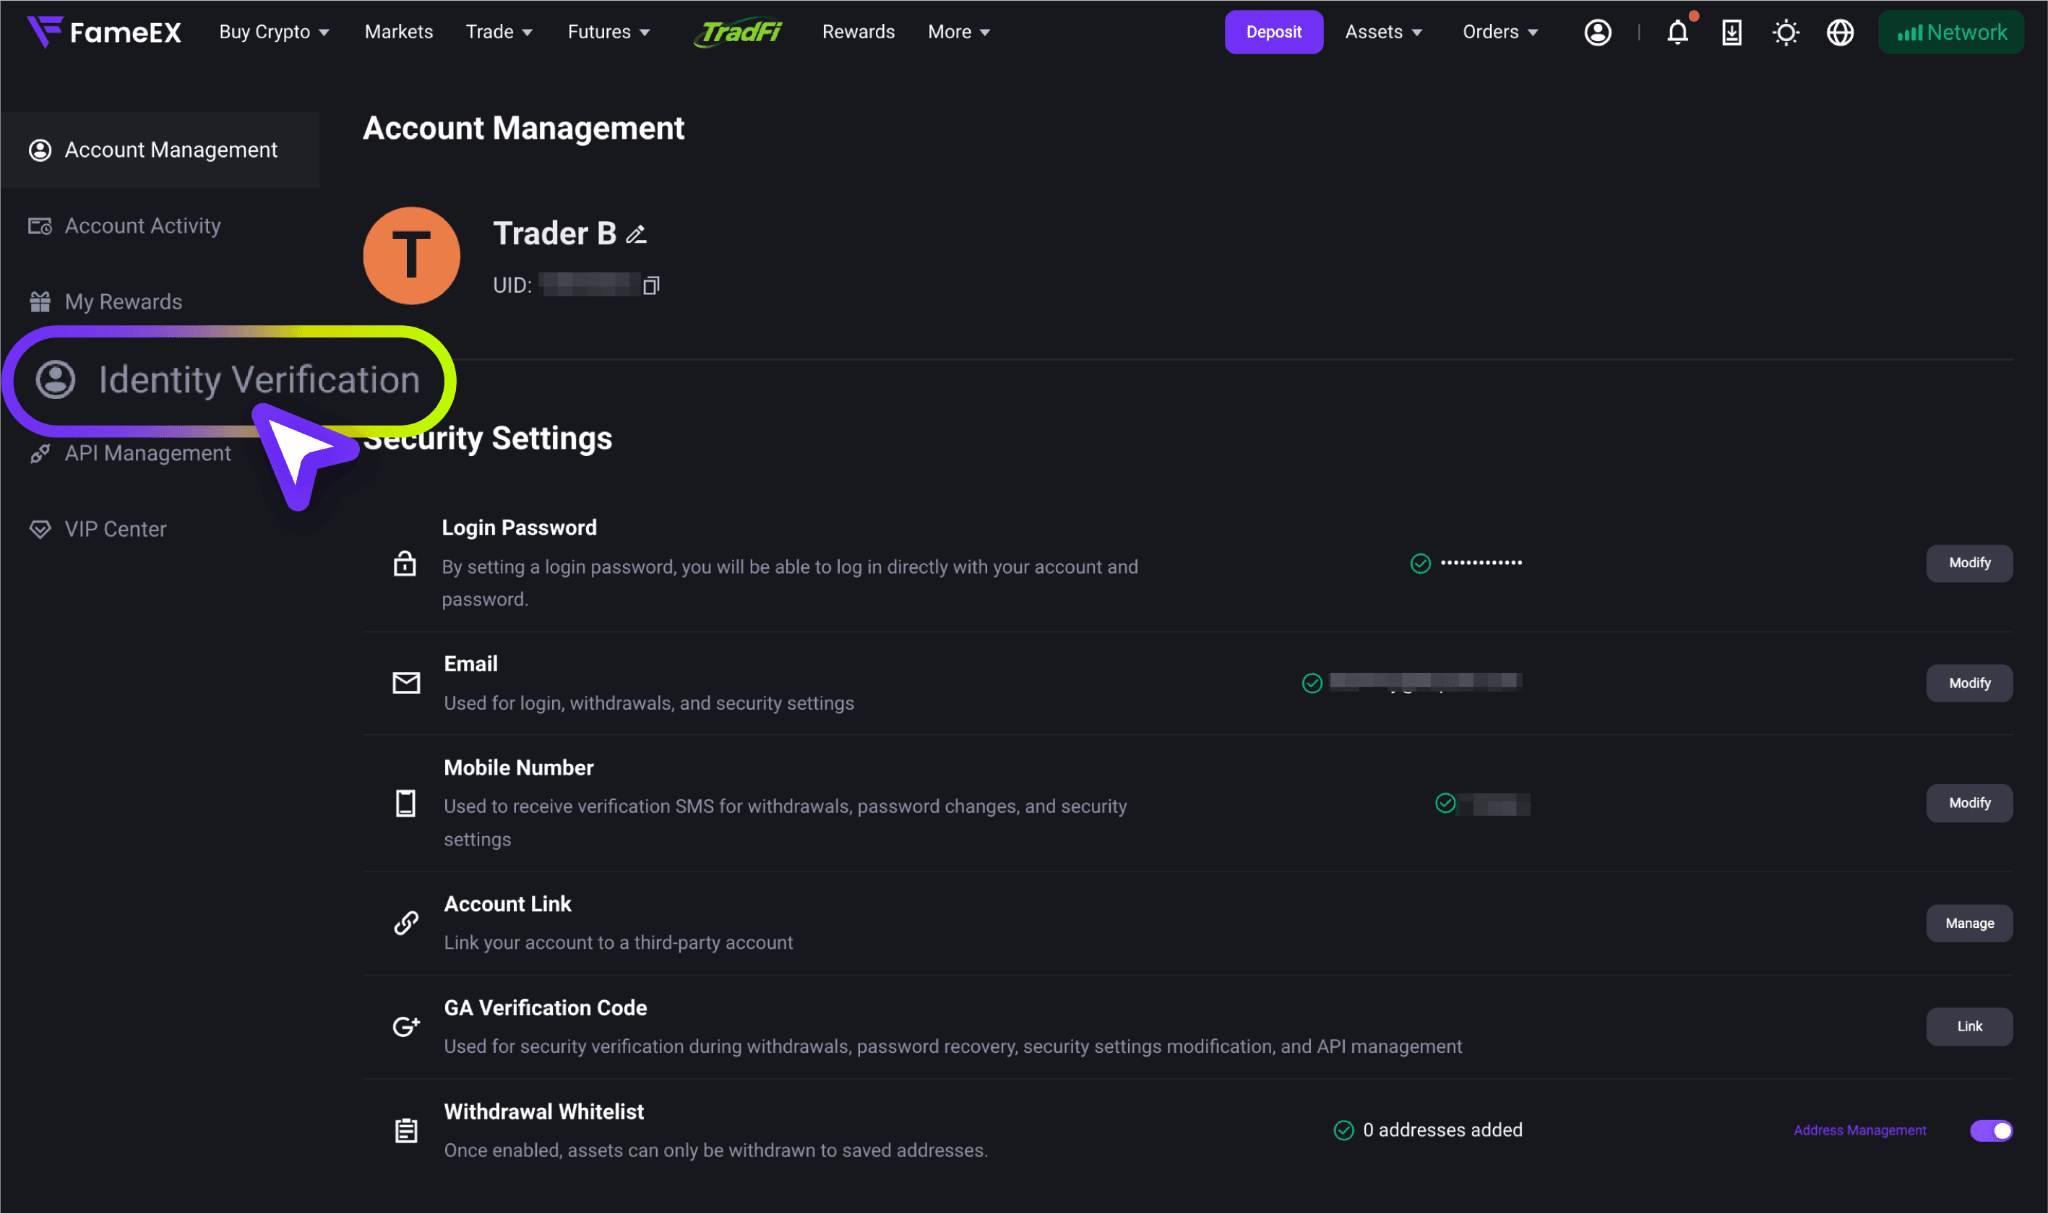
1) Visit the official FameEX website and log in to your account. Click the [Personal Center] icon in the upper-right corner of the page. Once you enter the account management page, select [Identity Verification] from the left side.

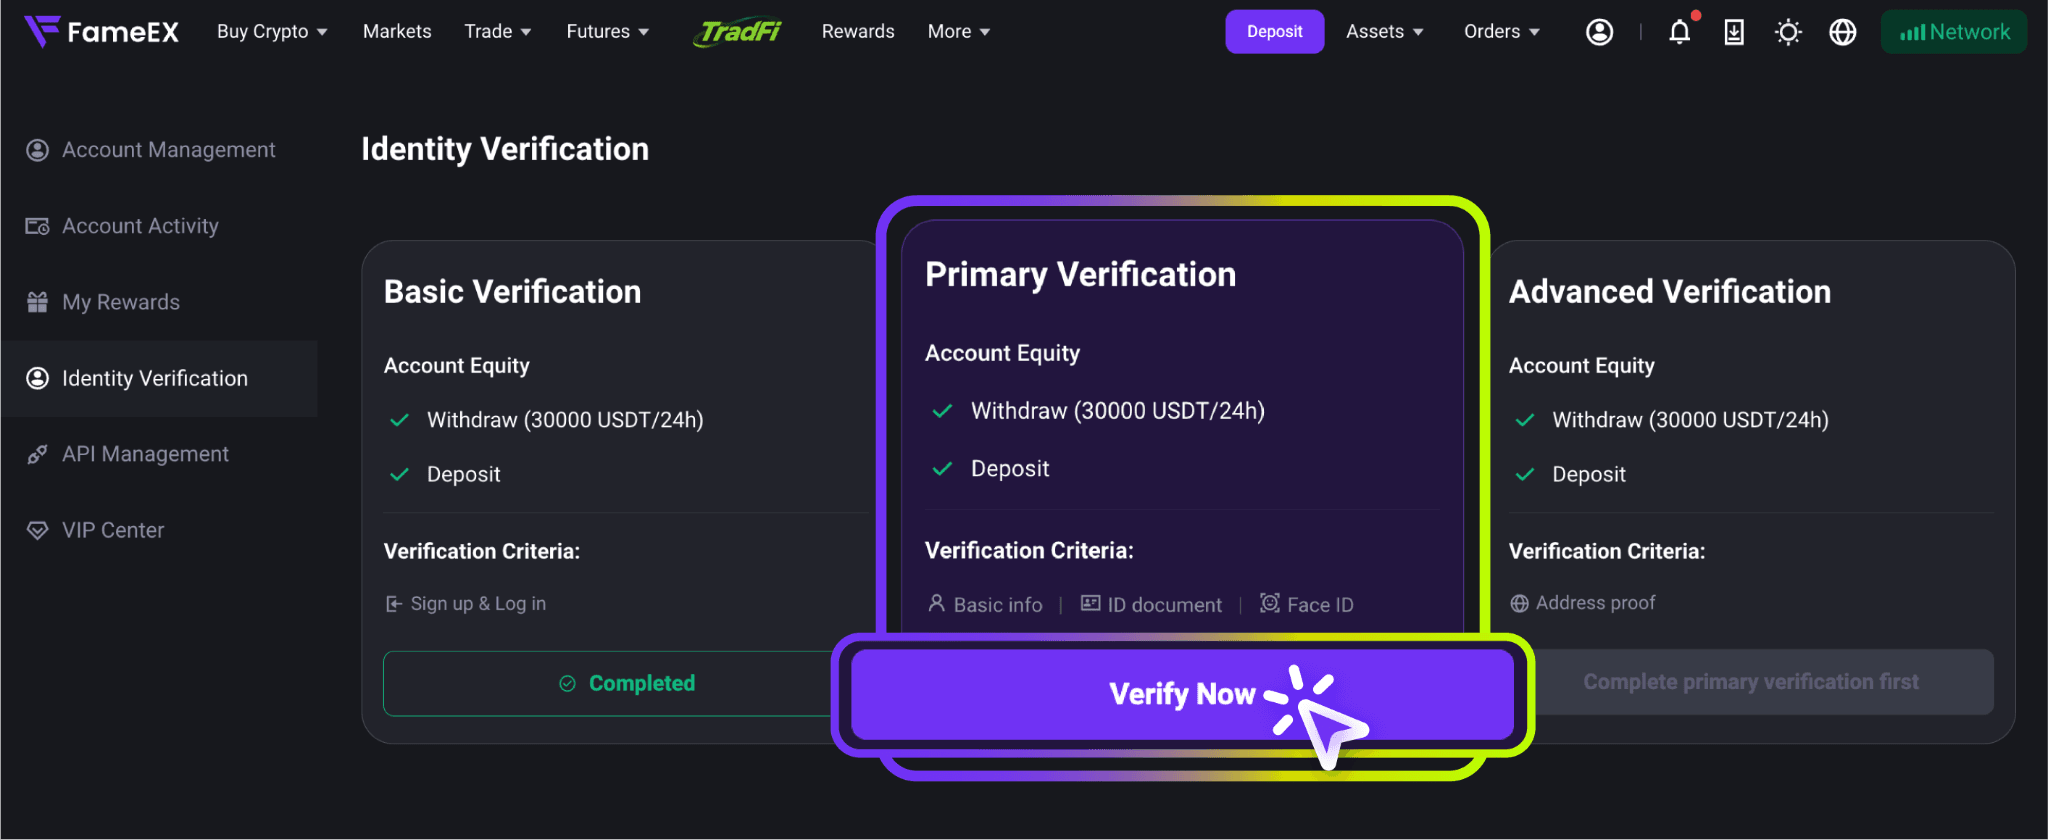
2) On the [Identity Verification] page, find the [Primary Verification] section and click [Verify Now]. The system will open the identity verification window.
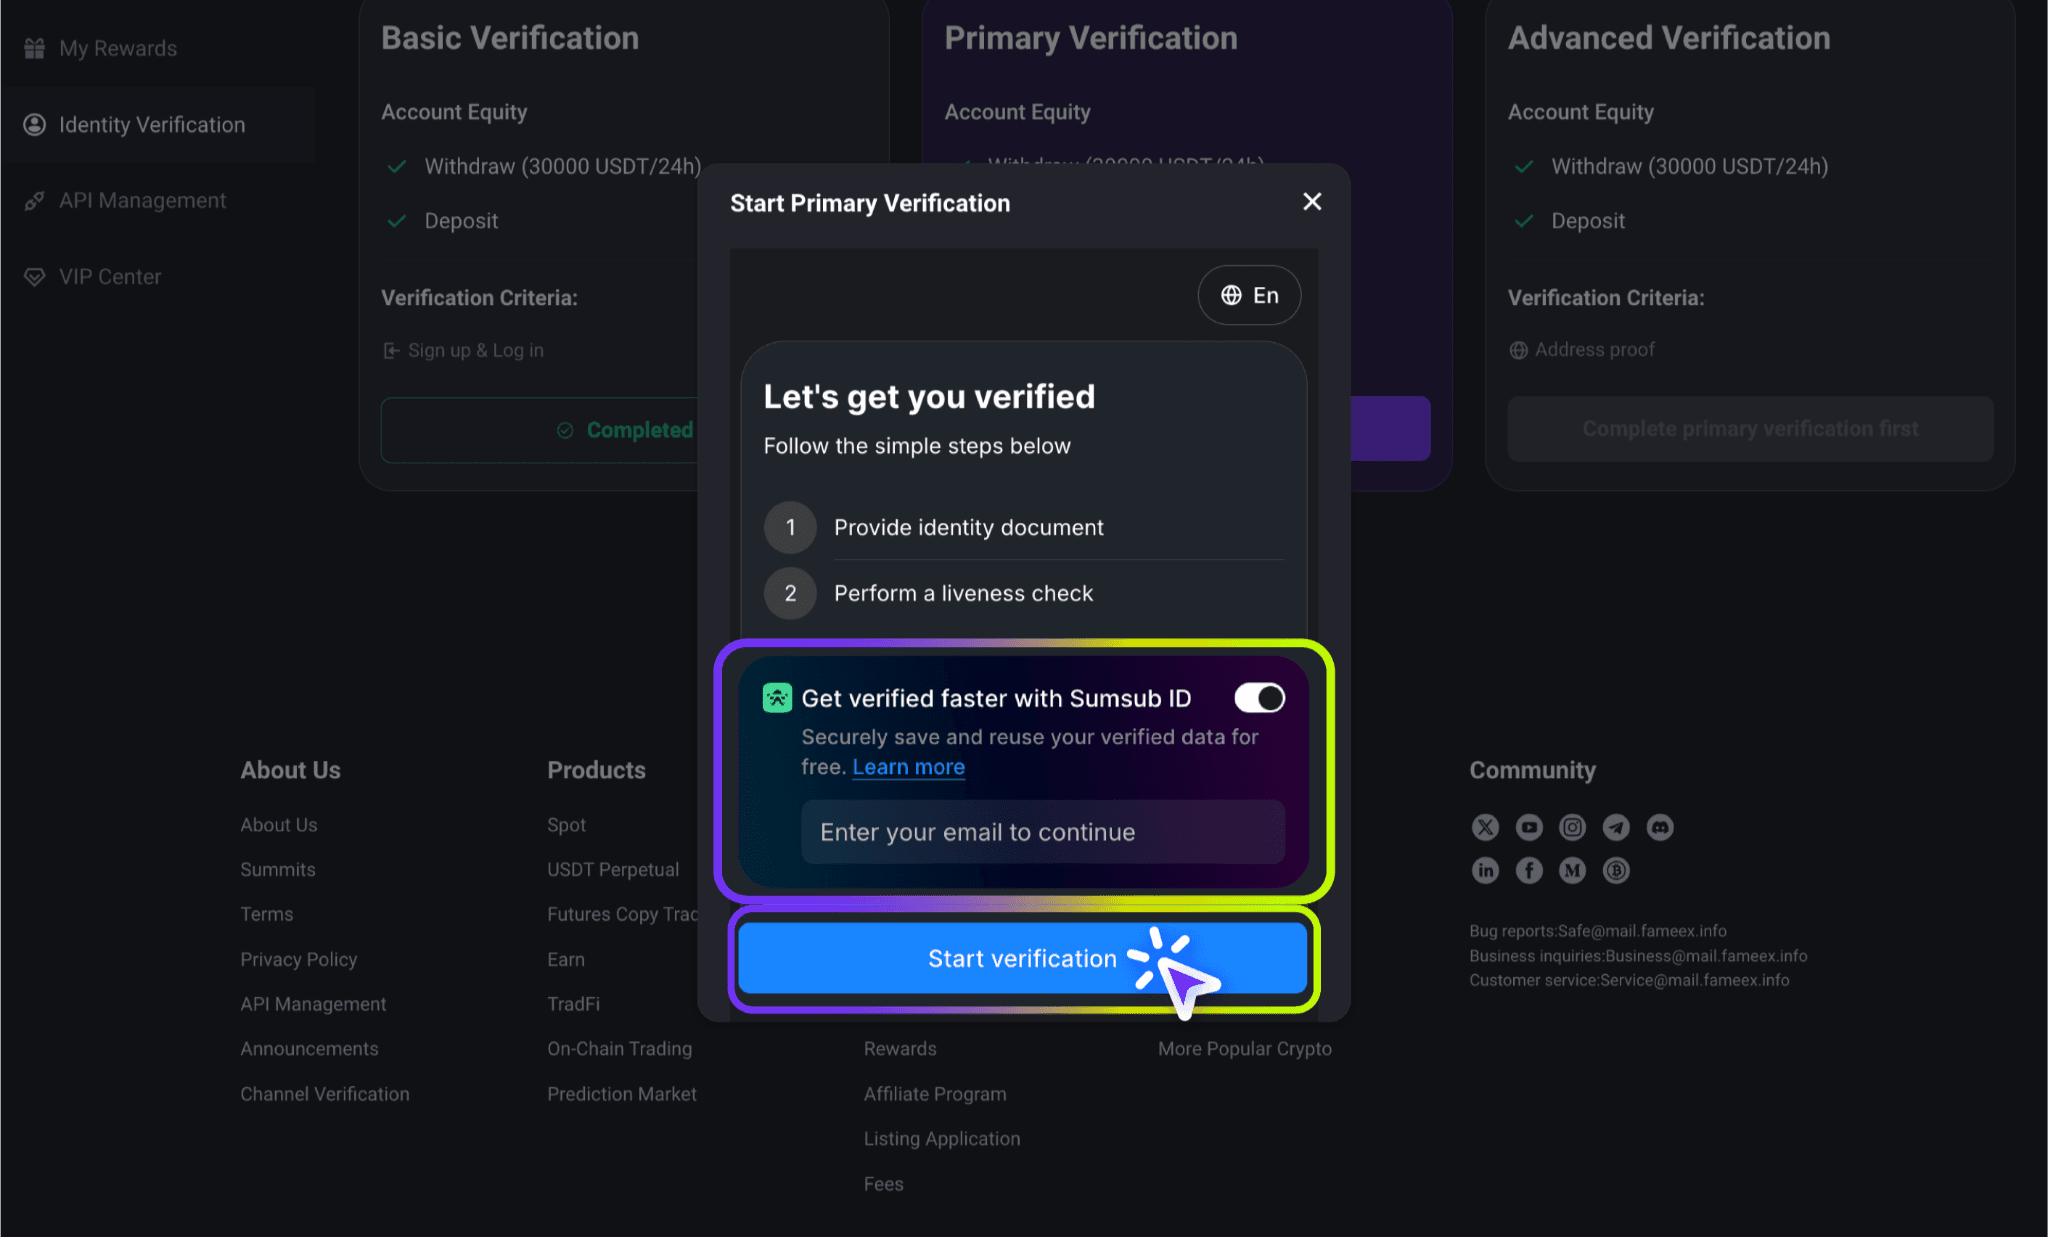
3) In the Primary Verification, you can either enter your valid email address in the Sumsub ID verification section or just continue to [Start Verification]. Follow the on-screen instructions to complete email verification before proceeding.
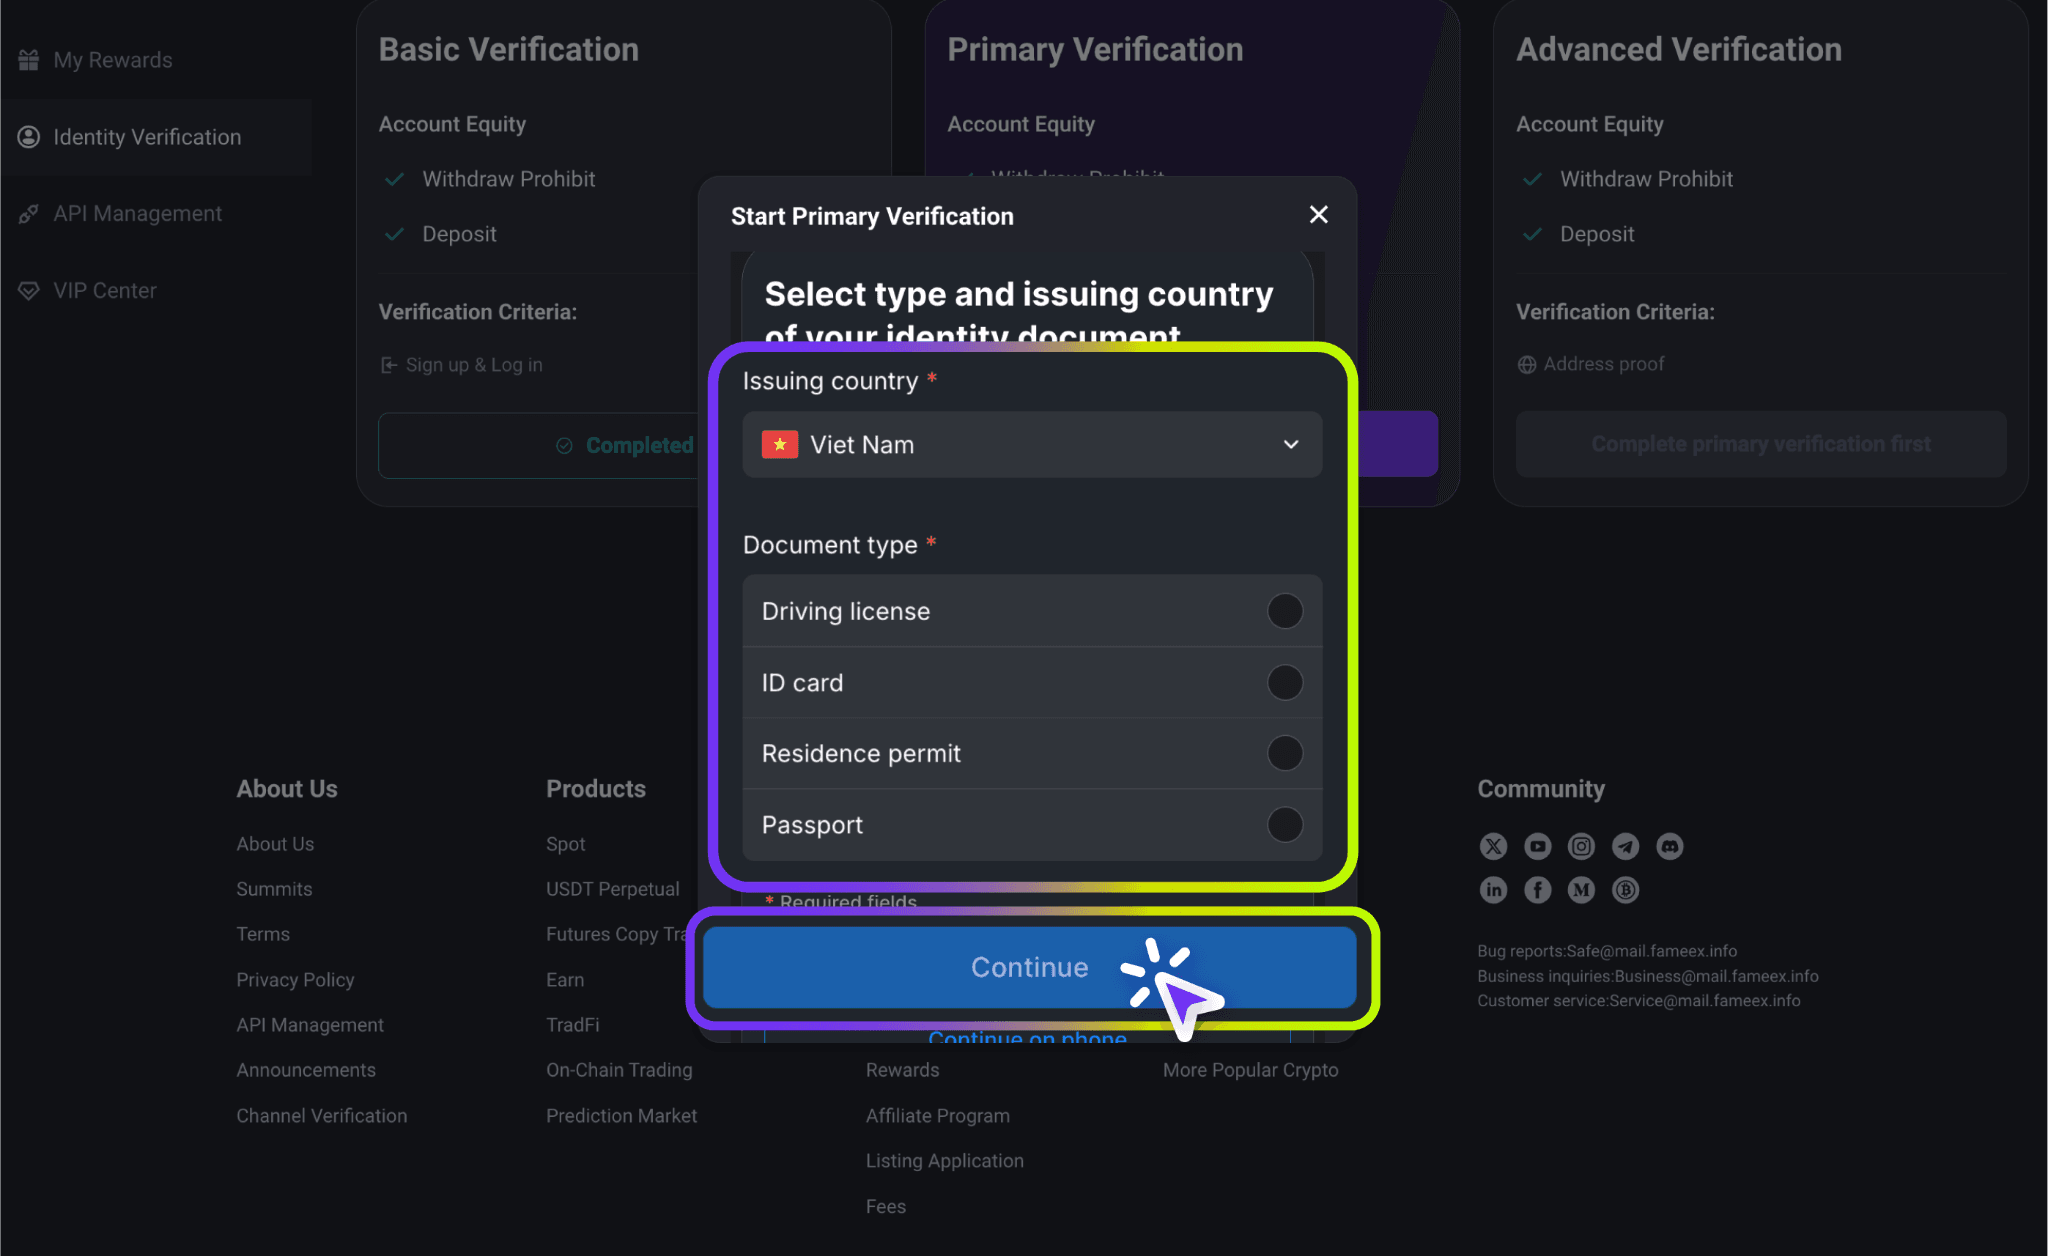
4) Select the [Issuing Country] and [Document Type] for your identity document. Available document types currently include driver's licenses, national identity cards, residence permits, and passports. Choose the appropriate option based on your valid identity document. Confirm your selection and click [Continue].
*Please note that supported document types may vary by issuing country or region. Refer to the options displayed on the verification page.
5) Upload your identity document as instructed. For example, if you select an ID card, the system will require images of both the [Front] and [Back]. Once the documents have been uploaded, review the submitted information and click [Continue] to proceed to facial verification.
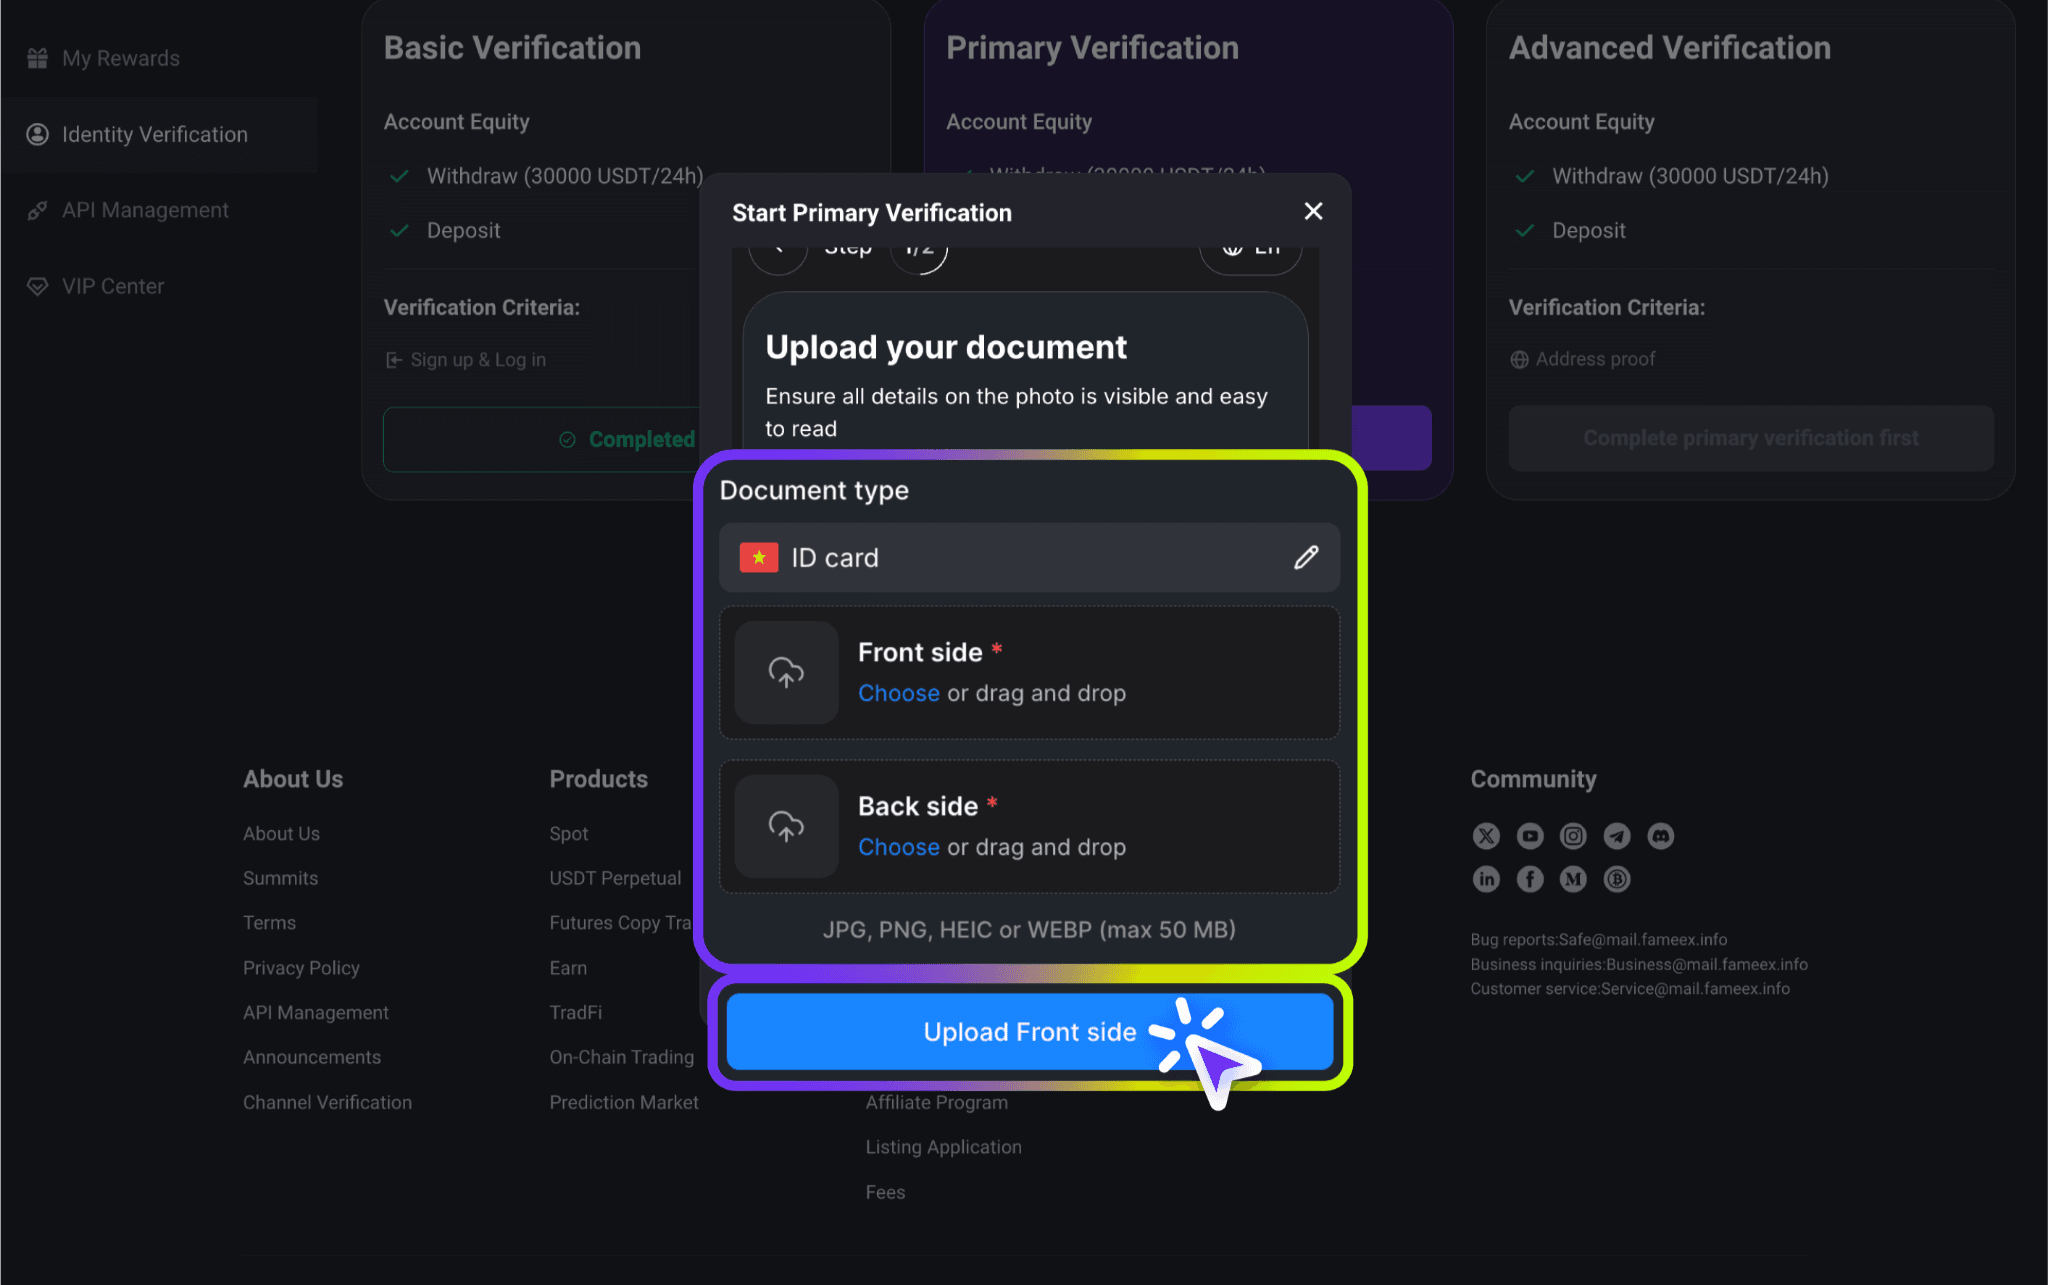
Supported image formats include JPG, PNG, HEIC, and WEBP. Each uploaded file must not exceed 50 MB. Make sure the entire document is visible and all text, photos, and personal details are clear and legible. Avoid glare, obstructions, blurry images, or cropped edges. The number of required images may vary depending on the document type. Follow the instructions displayed on the verification page.
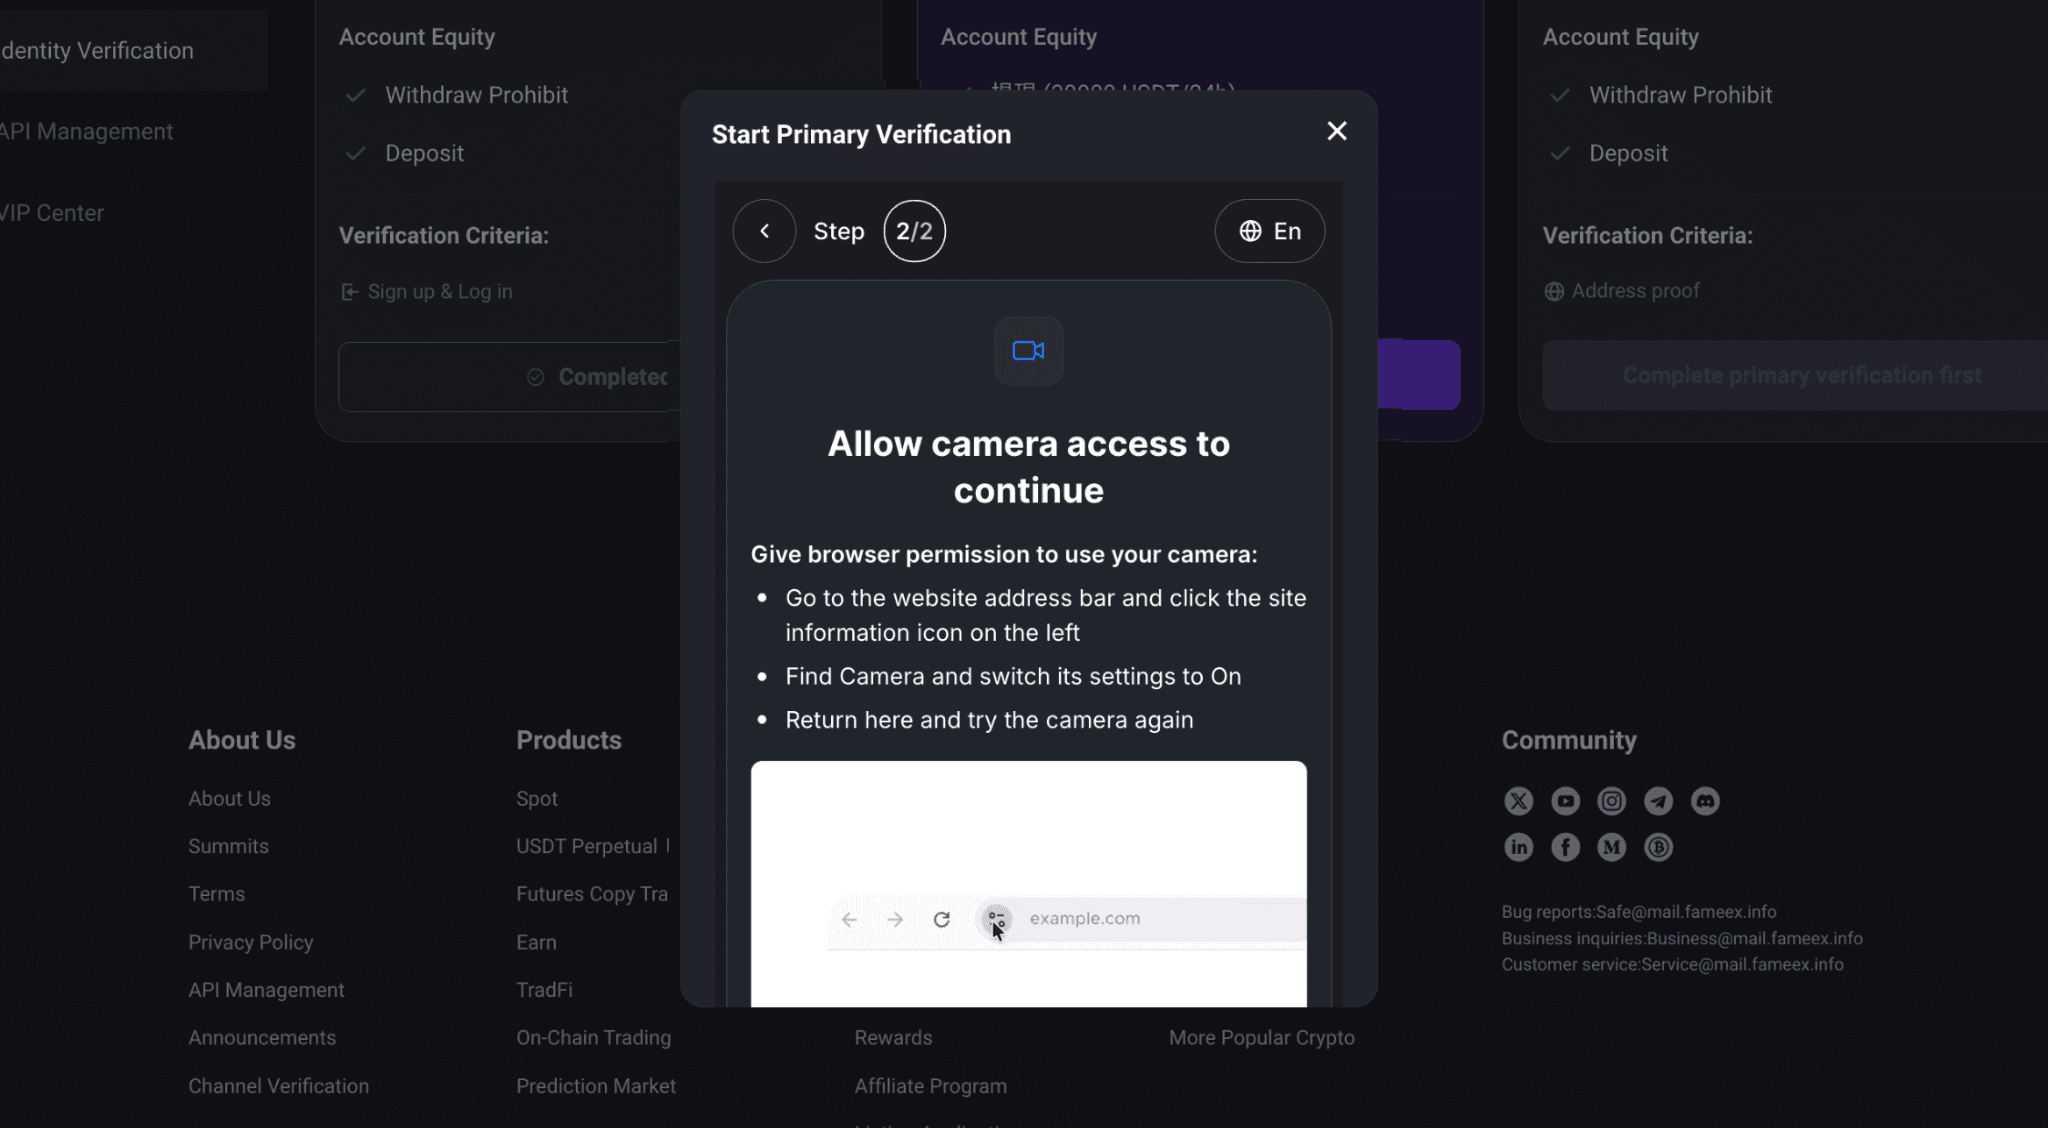
6) Before starting facial verification, make sure your device's camera is working properly and your internet connection is stable. Once you reach the facial verification page, follow the instructions to allow your browser to access the camera.
7) After granting camera access, position your face within the specific area on the screen. Follow the guide to complete the required facial movements or image capture. Make sure the surrounding area is well-lit and your face is clearly visible. Avoid covering your face or using a camera that produces blurry images, as these issues may affect the verification result.
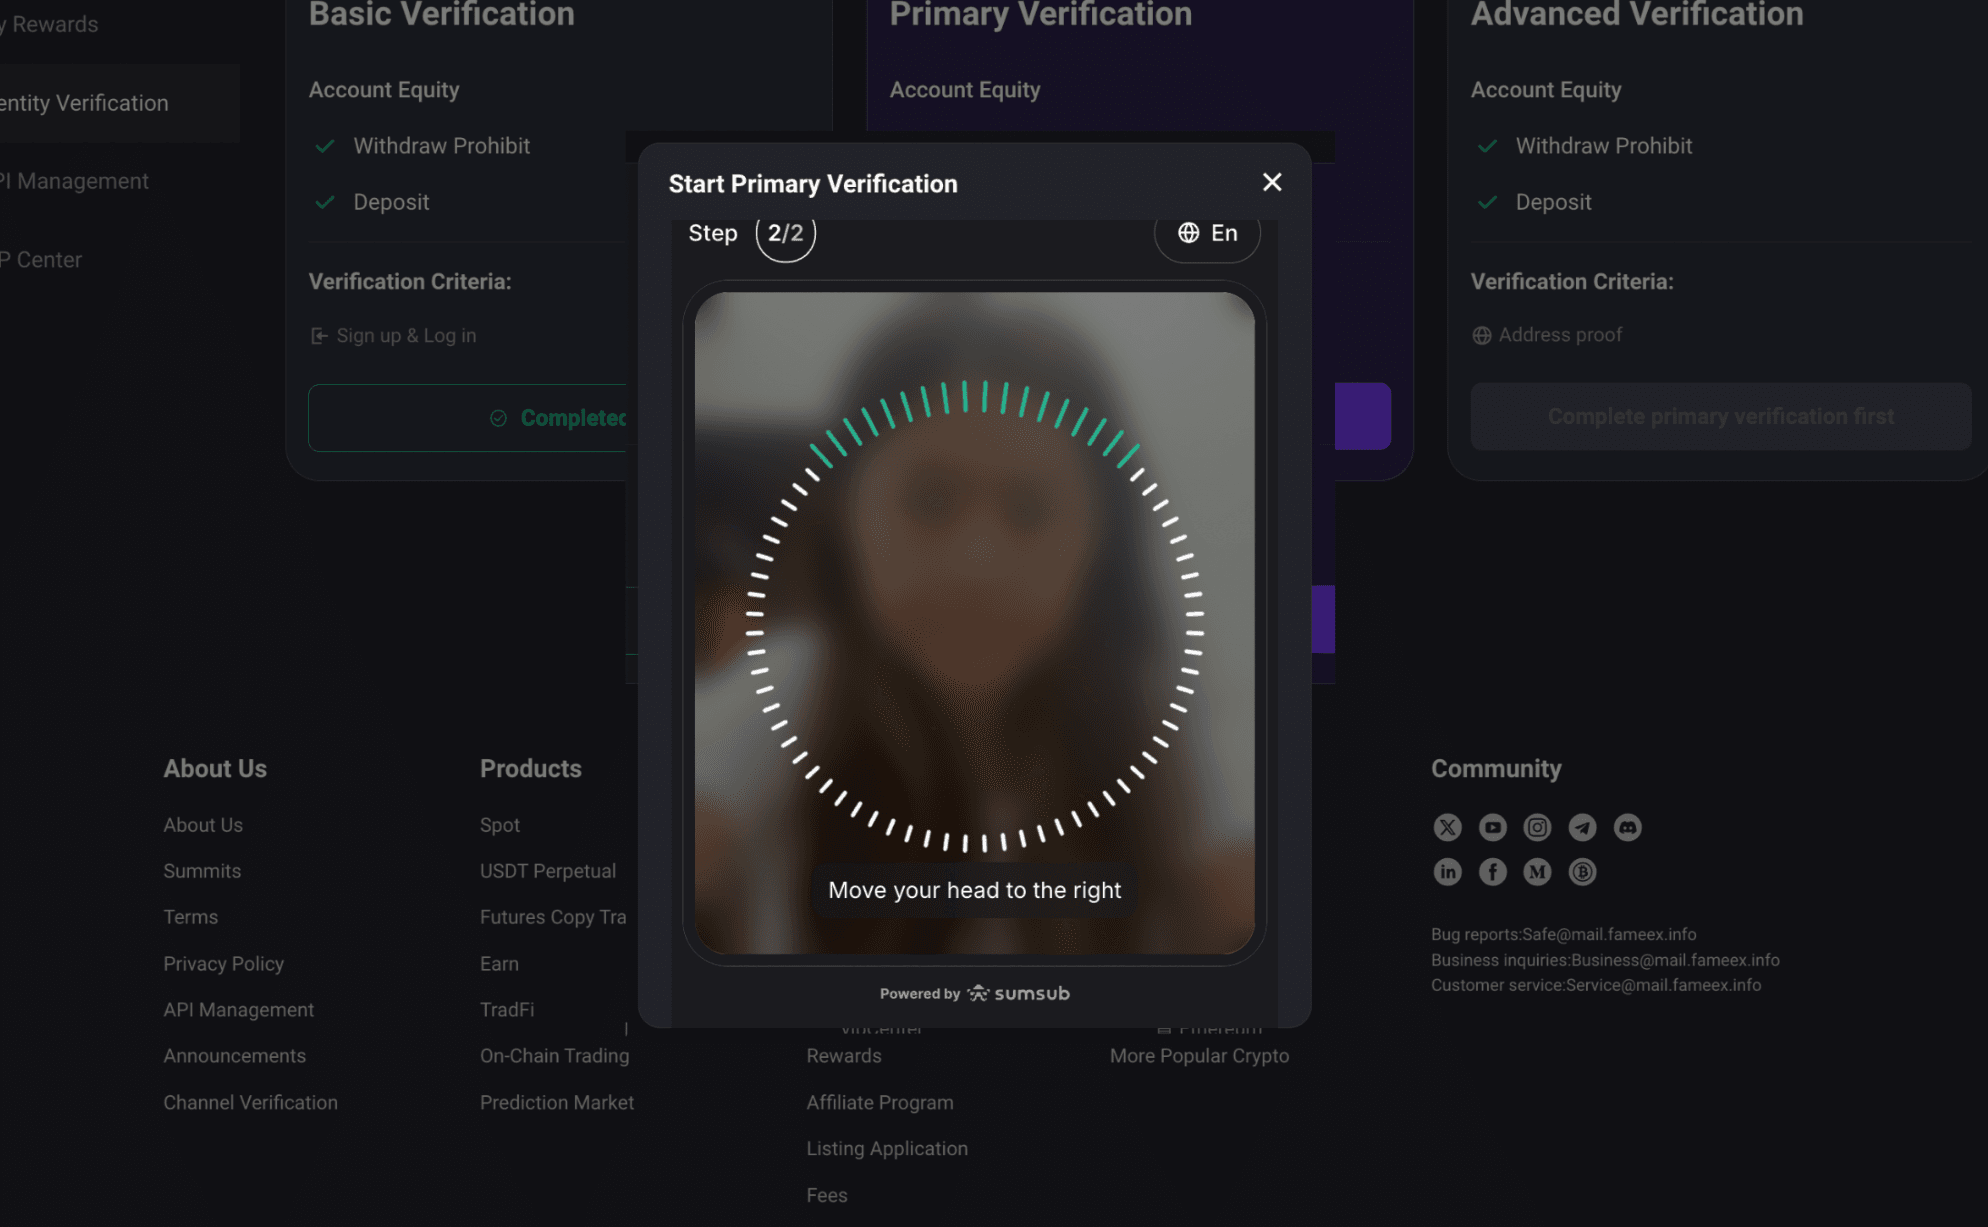
8) Once you have uploaded your identity document and completed facial verification, your submission will enter the review process.
You can return to the FameEX [Identity Verification] page to check your current verification status. You should also check the email address linked to your account for review notifications. If your verification is unsuccessful, review the reason provided by the system and follow the instructions to resubmit the required information or repeat the verification process.
3. How to Complete Advanced Verification on FameEX?
To apply for Advanced Verification on FameEX, you must first complete Primary Verification. You will then need to submit valid proof of address documents to verify your residential address. Follow the steps below to complete the process.
1) Go to the [Identity Verification] page first. Once your Primary Verification has been approved, find the [Advanced Verification] section and click [Verify Now]. The system will open the Advanced Verification window. If you have not completed Primary Verification, the system will prompt you to complete it before proceeding.
2) In the Advanced Verification window, you will be asked to upload a valid proof of address document. Select a document that meets the requirements and clearly displays your residential address. The following four types of documents are currently accepted:
- Valid ID Document: A valid identity document that includes your full residential address.
- Bank Documents (Issued Within the Last 3 Months): Bank letters, bank statements, mortgage payment slips, or bank passbooks.
- Utility Bills (Issued Within the Last 3 Months): Home telephone, internet, television, water, electricity, gas, or other utility bills.
- Government-Issued Documents (Issued Within the Last 3 Months): Letters or notices from government authorities, voter registration certificates, tax assessments, temporary registration forms, affidavits, or vehicle registration documents.
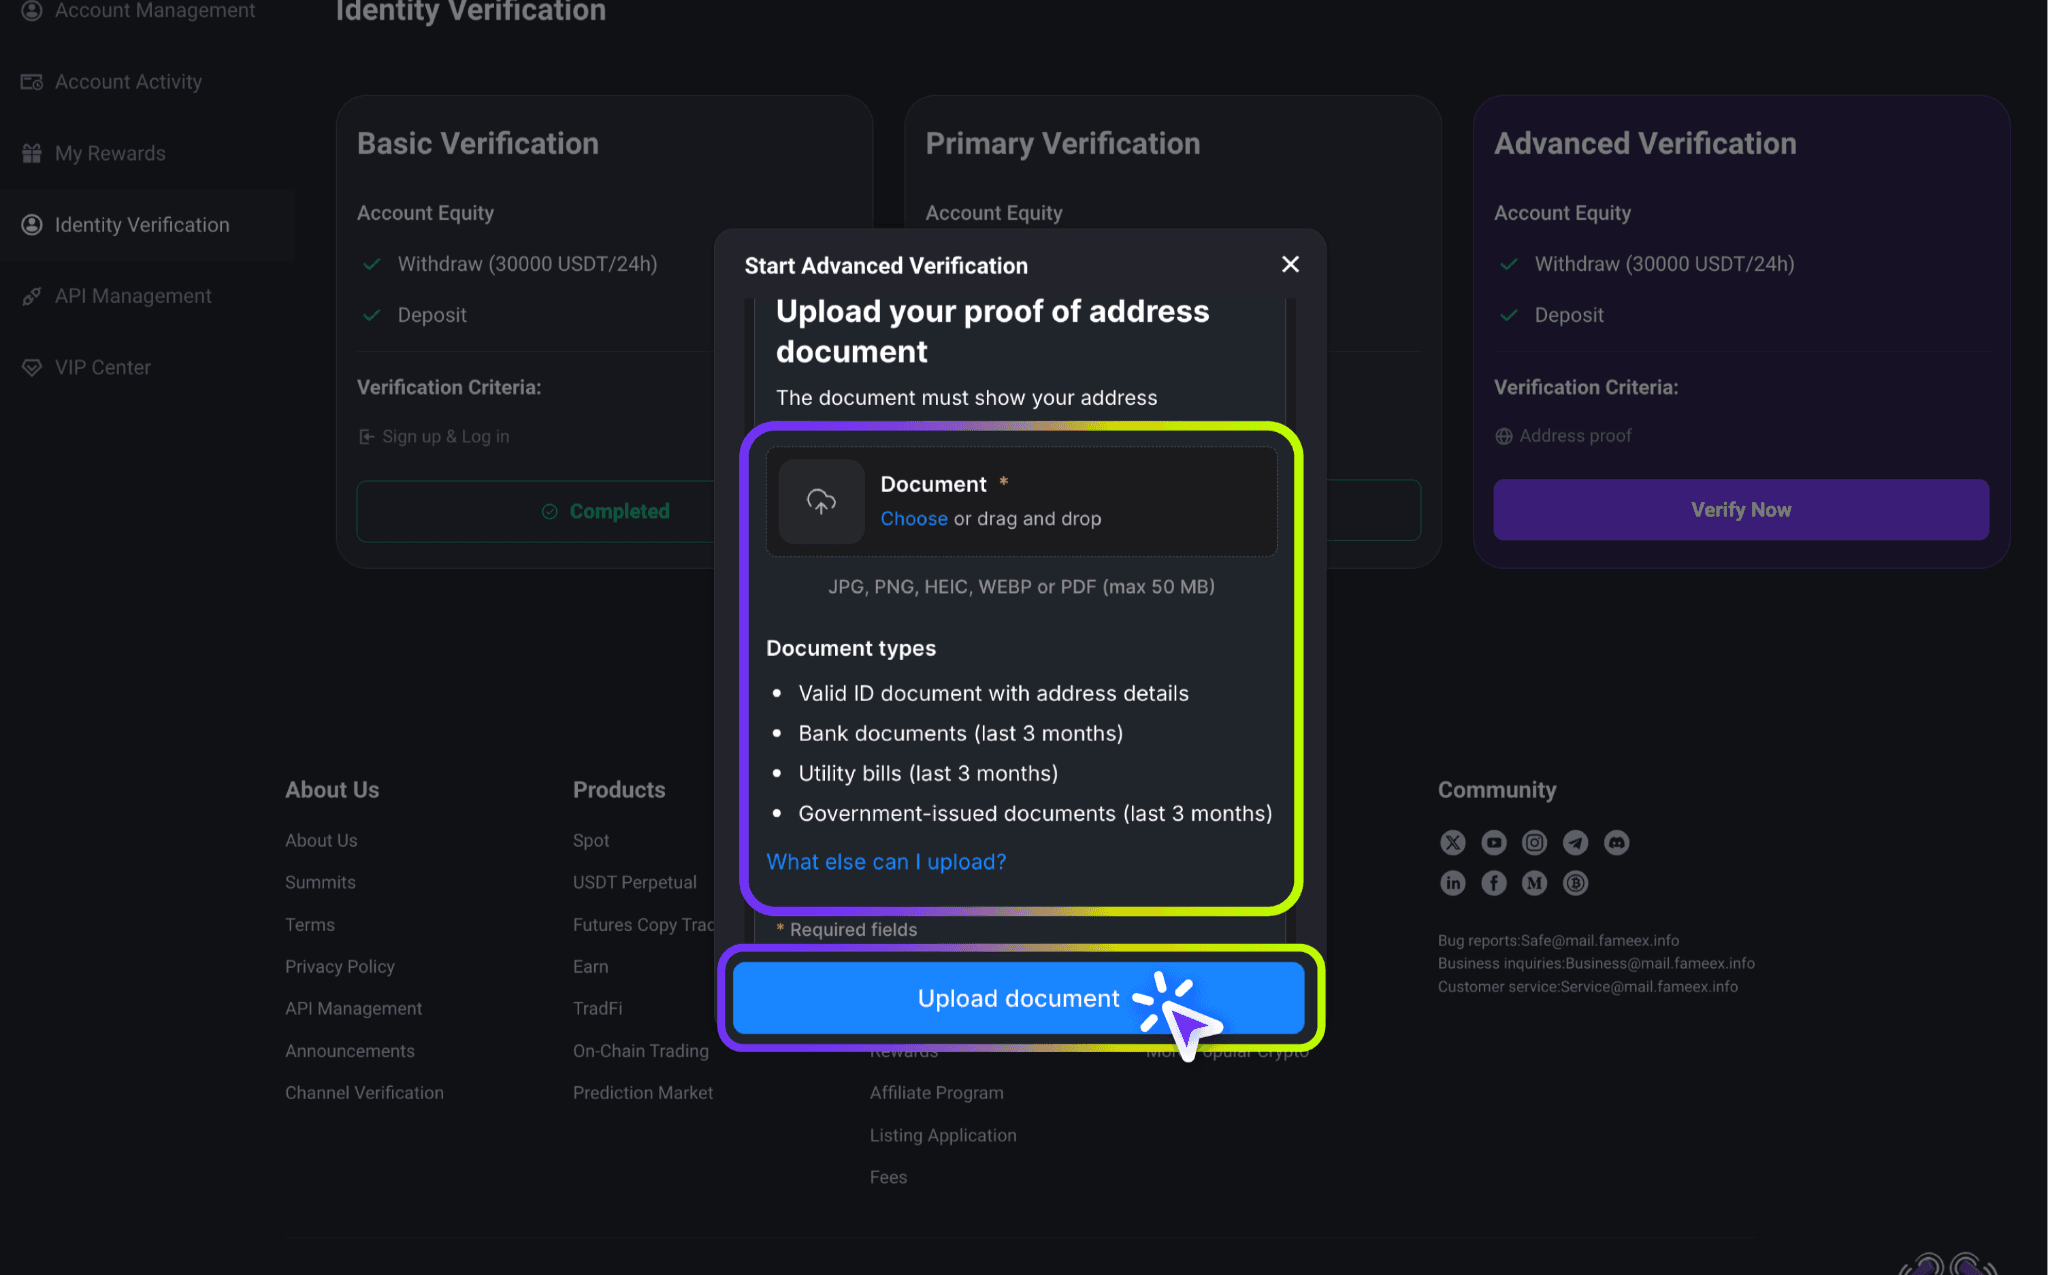
Please note that screenshots, purchase receipts, and medical bills are not accepted as proof of address. All submitted documents must meet the verification requirements and clearly display valid residential address information.
3) Upload a document that meets the requirements. Once the upload is complete, the system will display a document preview. Review the file to make sure all information is correct and clearly legible. After confirming the required details, upload your document and then click [Continue] to proceed with verification.
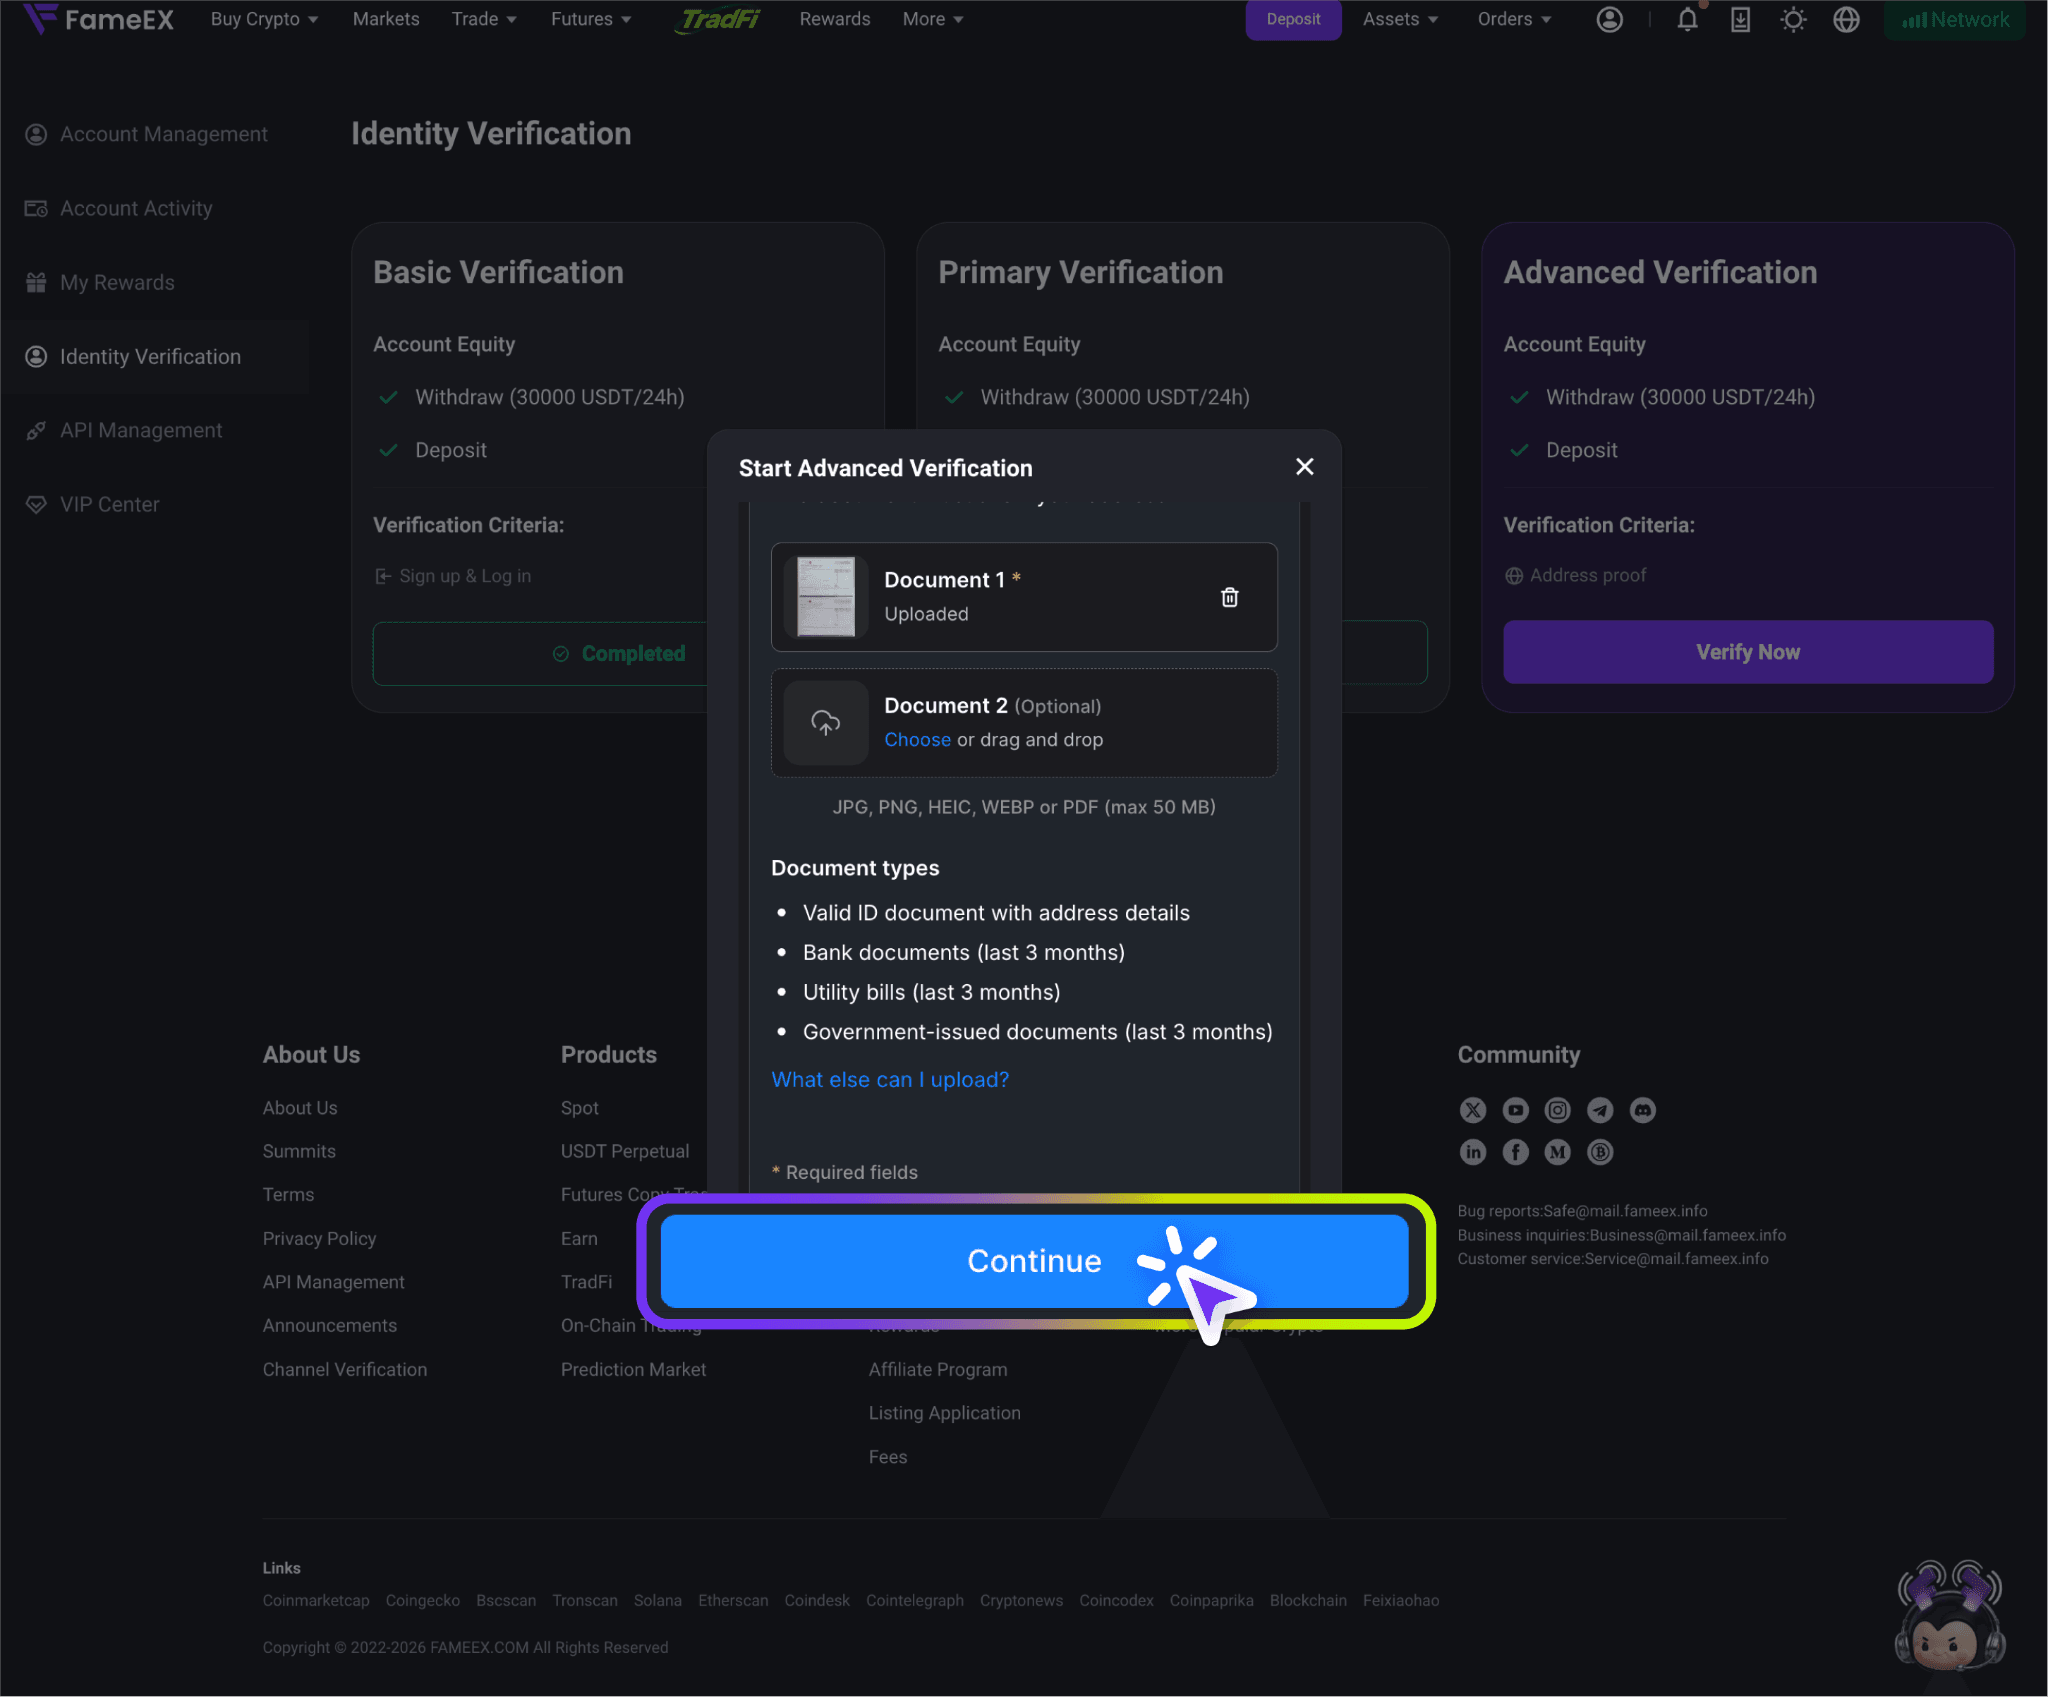
Supported file formats include JPG, PNG, HEIC, WEBP, and PDF. Each uploaded file must not exceed 50 MB. Make sure the entire document is visible and easy to read. Avoid blurry images, glare, obstructions, or cropped content.
4) Your submission will then enter the review process. If your document does not meet the requirements or additional information is needed, follow the on-screen instructions to resubmit an eligible proof of address document.
4. What Should I Do If KYC Verification Fails?
KYC verification may fail due to issues with your submitted identity documents, facial liveness check, or internet connection. Common reasons include:
- Unclear or Incomplete Identity Documents: The uploaded images may be blurry, affected by glare, partially obstructed, or cropped. These issues can prevent the system from reading the document information correctly.
- Incorrect or Unsupported Document Information: The selected issuing country, document type, or submitted information may not meet the verification requirements. Expired identity documents may also be rejected.
- Unsuccessful Facial Liveness Check: Poor lighting, facial obstructions, blurry camera images, or failure to follow the required facial movements may prevent successful verification.
- Internet Connection or Camera Permission Issues: An unstable internet connection or missing browser camera permissions may interrupt the document upload or facial verification process.
If verification fails, first check the specific reason displayed on the verification page. Review your document information, uploaded images, and device settings before trying again. Follow the instructions to complete the verification process. If the issue persists after multiple attempts, please contact FameEX official online customer support for assistance.
5. Frequently Asked Questions (FAQ)
Q1: What Documents Are Required for FameEX KYC Verification?
A: For Primary Verification, you need a valid identity document and a device with a working camera to complete the facial liveness check. Advanced Verification requires you to complete Primary Verification first and then submit an eligible proof of address document.
Q2: What Identity Documents Does FameEX Accept for KYC Verification?
A: The verification system currently supports national identity cards, passports, driver's licenses, and residence permits. Accepted document types may vary depending on the issuing country or region. Please refer to the requirements displayed on the verification page.
Q3: How Long Does FameEX KYC Verification Take?
A: The review time may vary depending on the completeness of your submitted information and the actual verification process. After completing the verification steps, you can check your current status on the [Identity Verification] page. Please also check for any related review notifications.
Q4: Can I Apply for Advanced Verification Without Completing Primary Verification?
A: No. You must pass Primary Verification before applying for Advanced Verification. If you have not completed Primary Verification, follow the instructions on the page to upload your identity document and complete the facial liveness check first.
*Please note that verification requirements, supported document types, and the verification interface may vary depending on your location or platform updates. Refer to the latest information displayed on FameEX for the applicable requirements.